
Preparation
To get Salesforce to send emails using Office365, you’ll need to have the following in place:
- Email with Office365.com
- Create an account for SMTPRelay at https://app.getsmtprelay.com
Getting started
For office to work with multiple users in salesforce, you will need to create a user / principle for salesforce. This will be the user who is sending emails on behalf of the salesforce users.
In order to allow this we need to create a user in Office365 and configure it to allow sending on behalf of other users.
Create an Office365 email sender user
Go to the Office365 admin portal (https://portal.office.com/adminportal/home) and go to Users, Active users. Click Add a user and enter the details of this user. We suggest something like “Salesforce” to indicate that this account will be used for sending emails from salesforce.
After the account is created, you’ll need to add the user to all the mailboxes as a delegate.
Go through each user in the list, scroll down to Mail settings and click Edit Exchange properties. This will take you to a new screen.
In this new screen, go to mailbox delegation and add the salesforce user to the “Send As” list.
After you’re done click save.
Once you have done this for all users, you’re ready to set up SMTPRelay and Salesforce.
A user is created which is allowed to send emails on behalf of other users. We will be using these credentials to configure SMTPRelay.
Log in to SMTPRelay, and go to your services list:
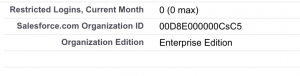
Click Add a New Relay and enter the Office365 smtp credentials. Enter your salesforce orgId. You can find the orgId by logging in to salesforce. Its under Setup, Company Profile, Company Information. It’s the 15-character code under Salesforce.com Organization ID.
The smtp settings for Office365 are:
smtp.office365.com port 587
After you click Save, we will automatically validate the authentication settings.
In Salesforce, go to Setup, Email Administration, Email Relay Activation. Enter the following:

- Email Host: relay.getsmtprelay.com
- Port: 587
- TLS Setting: “Preferred”
- Uncheck “Restrict Relay To Domains”
- Check Active
Click save.
You might notice a warning about using a relay in combination with bounce management. Office365 will take care of this and will otherwise not allow salesforce to send emails. In Salesforce, go to Setup, Email Administration, Deliverabiliy. Uncheck the following options:
- Uncheck “Activate bounce management”
- Uncheck “Enable compliance with standard email security mechanisms”
Finally, click save.
You should now be able to send a test message from Salesforce. It should be delivered and show up in your Office365 console. If it is not delivered to your mailbox, but does show up in Office365, please check your Office365 and DNS configuration.
Recent Comments